A tutorial series on using virtual control voltages (CV) in Propellerhead Reason music production software. Revised 2013-01-19.
This tutorial will show how to do basic CV processing with Thor, using Thor's Modulation Bus section, which can be used as a patchbay for mixing and routing audio and CV signals. We will cover basic operations such as scaling, phase inversion, merging, splitting, gating, and biasing (shifting the centerline of a signal upward or downward by adding a DC component). You can think of Thor as being a Swiss — er — Swedish Army Knife of CV.
I will be using an updated version of the CV testbench Reason song file that was introduced in CV tutorial 1.
You can download the updated setup here:
CV-Thor-testbench.reason.zip (zip archive of Reason song file)
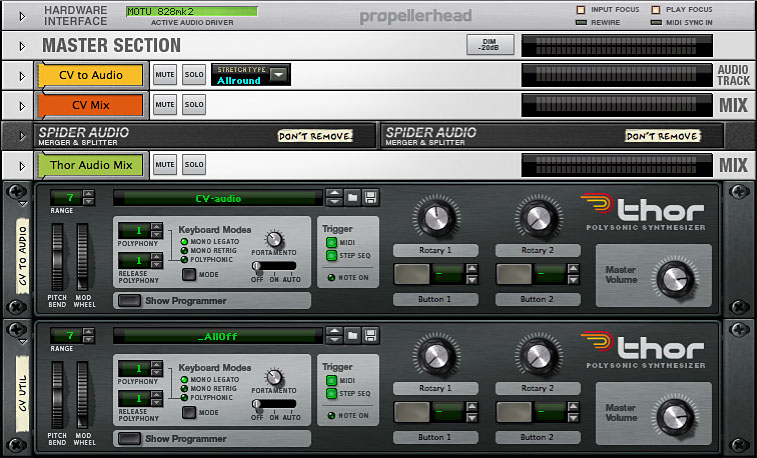
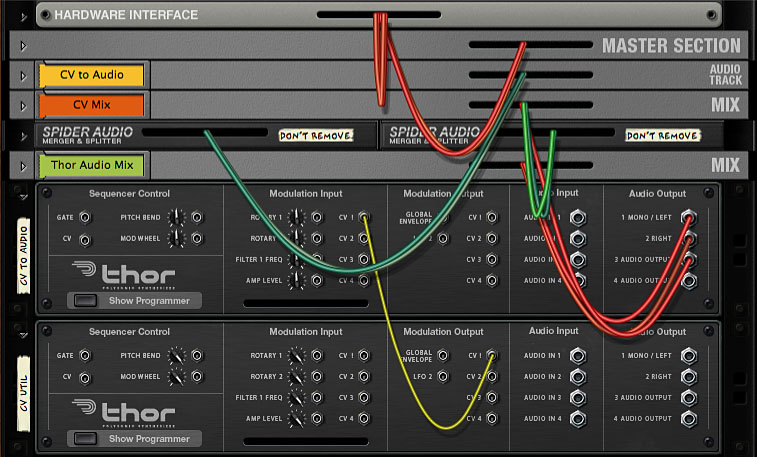
In this setup the upper Thor takes any CV signal on its CV1In and converts it to an audio signal to be recorded on the "CV to Audio" track so that you can view the time-domain waveform. The upper Thor also uses the incoming CV signal to modulate its Osc1 so that you get an aural sense of what the CV signal is doing. The audio plays whenever the main sequencer is running, and can be heard on the "Thor Audio Mix" channel. For more details on how this setup works, see Recording CV into an audio clip in CV tutorial 1.
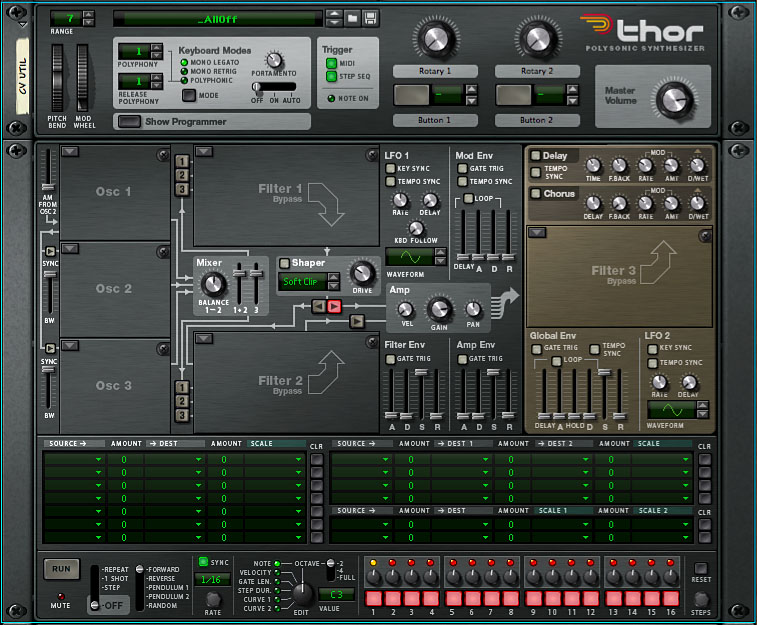
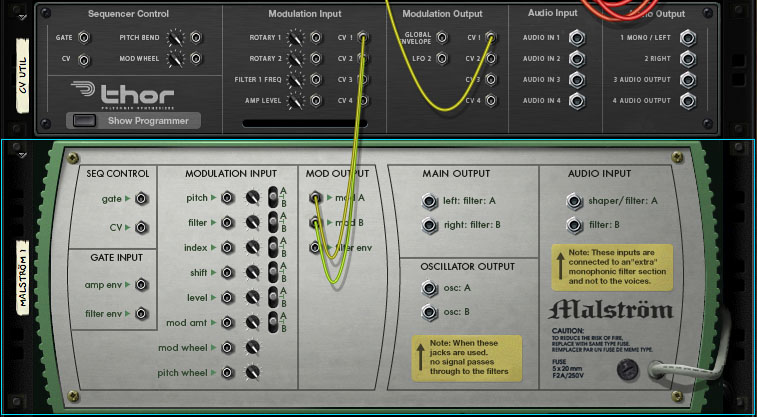
The lower Thor will be used strictly as a CV utility, It has been loaded with an "_AllOff" patch, which turns off all unneeded components such as oscillators, envelopes, and filters.
We will be using the Mod Bus section of the lower Thor. In most of the examples below, CV signals will be connected to the CV1 and CV 2 Modulation Inputs. The processed signal will appear on the CV 1 Modulation Output, which is is patched into the upper Thor so that the signal can be recorded to an audio track and viewed graphically.
A number of rack extensions (REs) are now available to process CV signals. One that I find especially useful is the ReVolt CV Processor, which has real-time graphical and numerical displays of CV signal levels. For simplicity I'm not showing ReVolt in these examples, but I did use it to check my examples.
You might ask, with all the REs available to operate on CV signals, why "roll your own"? Several reasons:
The examples in this tutorial will duplicate some of the things you can do with REs from Black & Orange, Zvork, Quadelectra, Groovy Melon, and others. On the other hand, those REs can do things that are more difficult or impossible with native Reason tools. They are all reasonably priced (some are even free!) and all have their own distinctive approaches to CV. I actually own most of these REs myself, and aim to review them in a future article.
Meanwhile, let's take a look at some of the basic CV operations you can do with Thor.
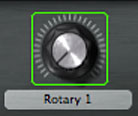
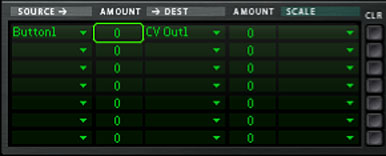
There are at least two easy ways to get Thor to output a constant CV signal. One way is to use the Mod Bus to patch Rotary1 to CVOut1 at Amount 100. (If you're following along and making these changes in CV-Thor-testbench.reason, use the lower, "CV Util" Thor.)

Then use the Rotary control to vary the signal level anywhere from 0 to 127. To get negative values, set Amount to -100 and use the Rotary to vary from 0 to -127. (But keep in mind that CV signals are actually streams of floating-point numbers in the -1.0 to +1.0 range, even though user-interface (UI) controls represent them nominally as integers in the -127 to +127 range.)
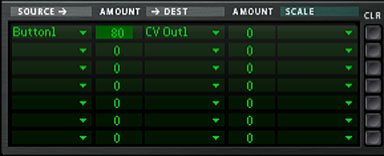
Another way to generate a constant CV is to use Button1 to generate a full-scale (+1.0) signal and then vary the Destination Amount from -100 to 100 to set the level.
Here the relationship between Amount and CV signal level is nonlinear, as shown in the following table.
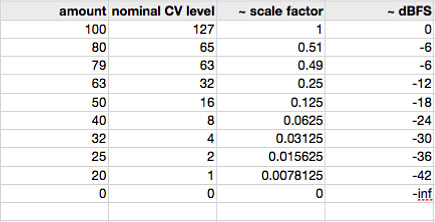
One issue here is that Amount cannot generate an exact 0.5 scale, which lies somewhere between Amount values 79 and 80. The Rotary control, on the other hand, generates an exact 0.5 when set at 64. Sometimes you do need an exact 0.5.
You can think of the Amount control as calibrated like a volume fader, with a logarithmic taper. (The LFO Level controls in the Pulsar RE have a very similar calibration. On Pulsar, though, a Level of 80% does scale amplitude by exactly 0.5.)
One very nice thing about these controls is that they are automatable. You can set up a sequencer automation track for Rotary 1 or for Amount and draw curves or ramps to generate varying CV signals. This is a nice alternative to using the Matrix device to generate CV curves, and the curves are smoother. As an example, let's automate Rotary 1.
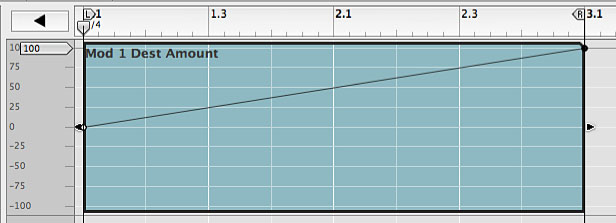
Right-click or Ctrl-click on the Rotary 1 control and select Edit Automation from the context menu to create a corresponding automation track. Now draw the following 0-127 ramp in an automation clip.
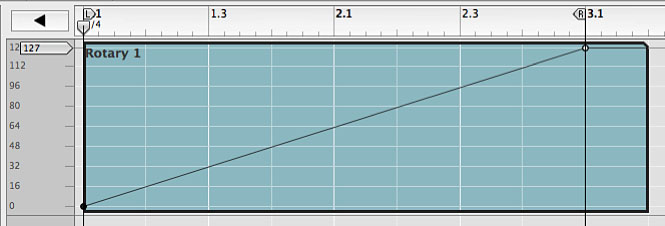
The CV output responds in a linear way.
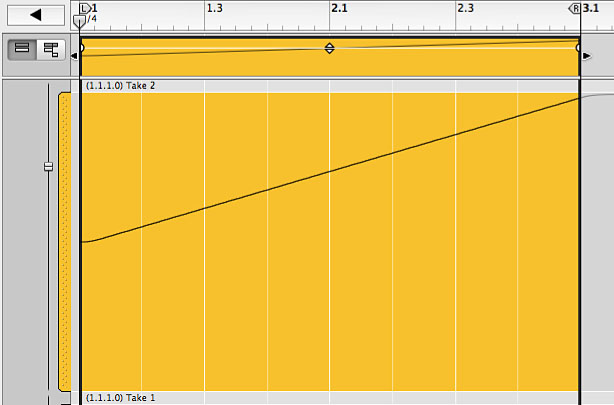
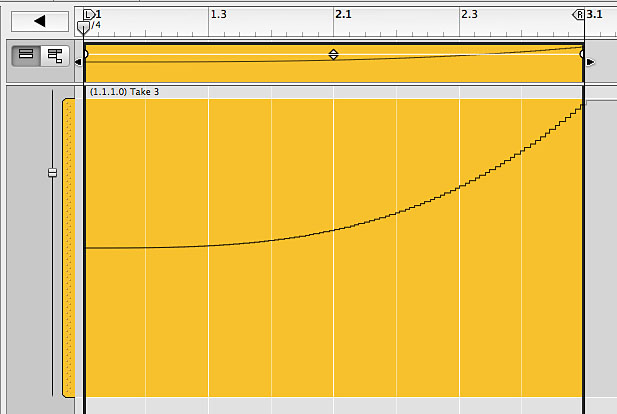
Amount can also be automated.
Select Edit Automation from the context menu (right-click or Ctrl-click on the Destination Amount box) to create an automation track for this control. Now draw a 0-100 ramp in an automation clip.
This time the response is nonlinear.
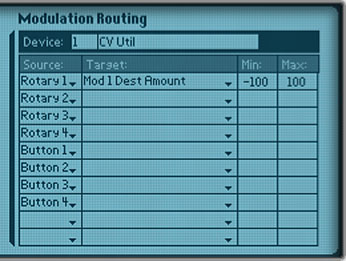
Thor's Rotary, Button, and Mod Bus Destination and Scale Amounts are also assignable to controls in the Combinator. For example, we could put this Thor inside a Combi and assign one of the Combi's Rotaries to control Destination Amount to scale the CV signal.
If you're following along and making these changes in CV-Thor-testbench.reason, use the lower, "CV Util" Thor. Make incoming CV connections to the CVIn1 and CVIn2 jacks on the back of that Thor. I'm not showing the incoming connections in these examples, but you may want to use Malstrom or Pulsar as a source of CV signals for your own experimentation. For example you could connect Malstrom's Mod A and Mod B outputs to CVIn1 and CVIn2.
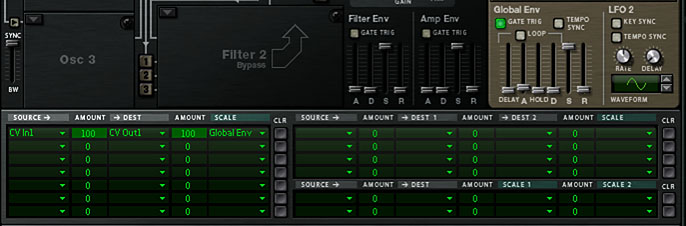
Here is a basic merge of the CV signals on CVIn1 and CVIn2.
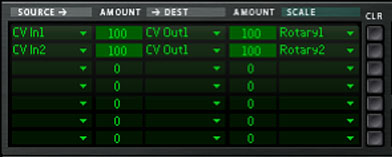
With Rotary 1 and 2 controlling the signal levels this is actually a mixer. The Rotaries are calibrated the same as the Trim controls on a Spider CV, but with the significant advantage that these Rotaries are automatable. With the Rotaries each set to 64 (scale by 0.5) the output is the average of the two inputs. To subtract CVIn2 from CVIn1, simply invert CVIn2 and merge the signals.
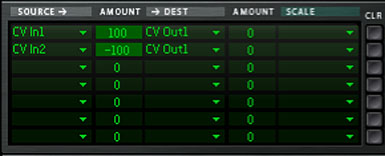
Setting the Destination Amount to -100 is an easy way to phase invert any signal. Here is a basic split of CVIn1 to the four CVOuts, with the fourth output inverted. These routings can of course be scaled and automated as in previous examples.

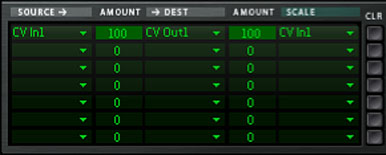
To multiply CVIn1 x CVIn2, use CVIn2 as the Scale source with Scale Amount 100.

At Scale Amount 100, the two signals are multiplied to produce the output signal. But as you fade Scale Amount down to 0, the output signal crossfades to the straight Source signal. At Amount 0, Scale from CVIn2 has no effect, and the CVIn1 signal passes through unchanged.
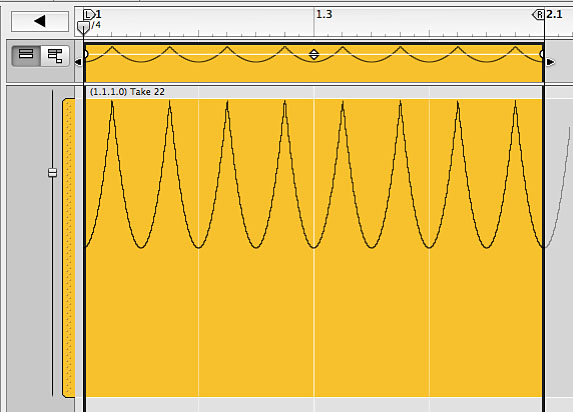
An interesting special case is multiplying a signal by itself.
For example, a full-scale, bipolar triangle wave is transformed into a unipolar wave that looks like this.
Any unipolar signal that goes from 0.0 to 1.0 can be used to gate the CVIn1 signal by multiplication. For example, use Button1 or Sustain Pedal to scale CVIn1 as a way to turn it on and off.
If Thor is getting note input from MIDI, Sequencer Control CV, or from an enclosing Combi, this can be used to gate CVIn1. Last Gate has the value 1 while a note is playing, 0 otherwise.

But keep in mind that any CV signal connected to Thor's Sequencer Control Gate CV In will trigger Last Gate and thus gate CVIn1. This second signal can be unipolar or bipolar. It will open the gate as soon as it goes positive and close the gate as soon as it hits 0 or below.
If you want to fade CVIn1 in and out more or less gradually, use Global Envelope with Gate Trigger enabled and adjust the Attack and Release times to get the fades you want.
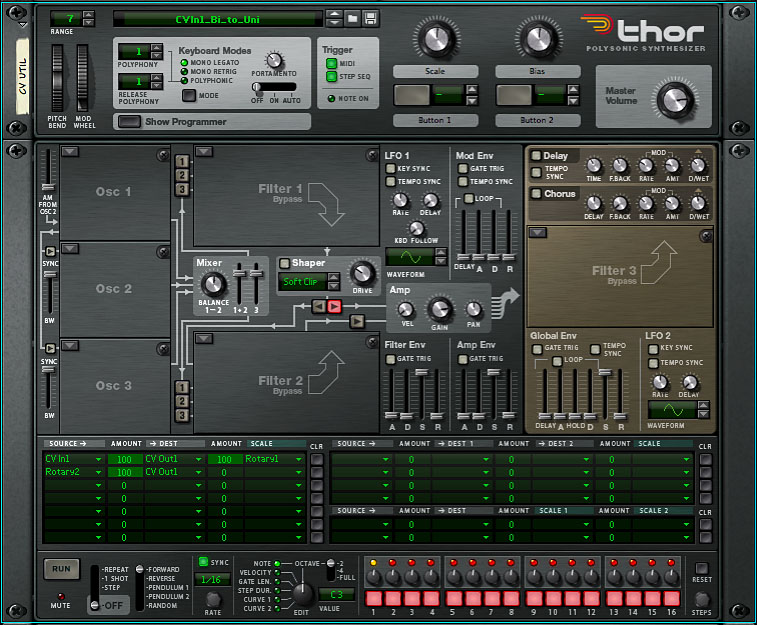
We did this example in an earlier tutorial, Converting bipolar to unipolar, but Thor provides a much simpler way to do it.
Suppose CVIn1 is a full-scale (-1.0 to +1.0) bipolar signal. To convert bipolar to unipolar (0.0 to +1.0), scale the signal by 0.5 and bias it by +0.5. The Rotaries can be used to generate the scale and bias. A Rotary setting of 64 translates to a CV value of 0.5.
To go the other way, unipolar to bipolar, double the amplitude of the signal and bias it downward by -1.0. Thor's scaling is limited to the -1.0 to +1.0 range, so we double the signal simply by adding it to itself. (Remember that there's no inherent reason CV signals can't have amplitudes greater than 1.0.) Then we use Rotary2, set to maximum and inverted, to bias the signal downward by -1.0.
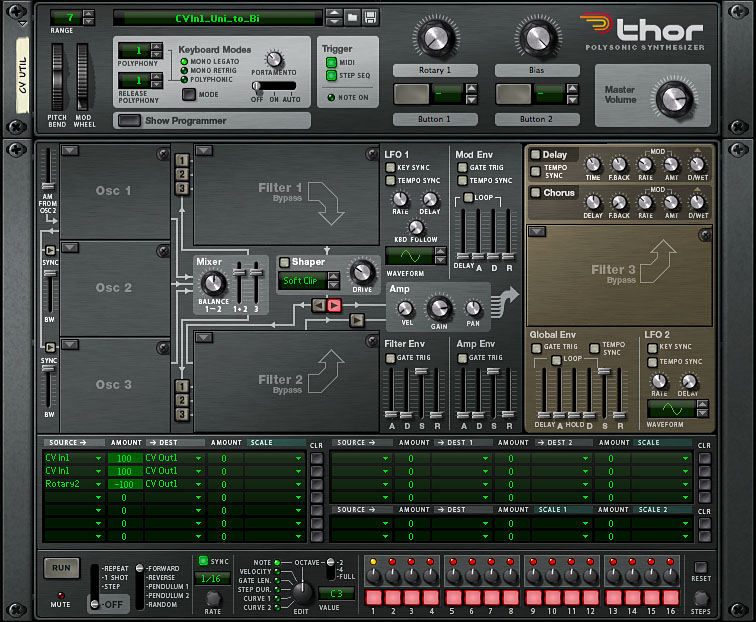
These setups do exactly the same thing as the previous setups in Converting bipolar to unipolar but are much simpler, implemented with a single Thor. It's always nice to figure out easier ways to do things.
That's it for now. I hope you get some musical use out of these examples. In Part II of this tutorial, I will continue to explore Thor's CV capabilities, including:
Next: CV tutorial 5: Thor as a CV (control voltage) utility, part II.
Images in these tutorials refer to Reason 6.5 user interface elements, which are, of course, Copyright Propellerhead Software.